Home studio: Listening position
listening position and correct room layout
The Secret to the Correct Listening Position
When setting up any listening or recording room, your speakers are the fundamental pillar of quality sound. If you already own a pair, try asking yourself: Am I honestly getting the proper audio I paid for?
Your speakers are trying to tell you a rich sound story, but often, your room changes and disturbs this narrative. If you want to hear that story clearly and accurately, you must first set up your room correctly. Even the best Hi-Fi speakers will only reveal their full glory if they are set up correctly, within an acoustically designed room.
In this section, you will learn how to organize a room for music studios, listening rooms, or home theaters to achieve highly accurate sound reproduction.
Getting Started
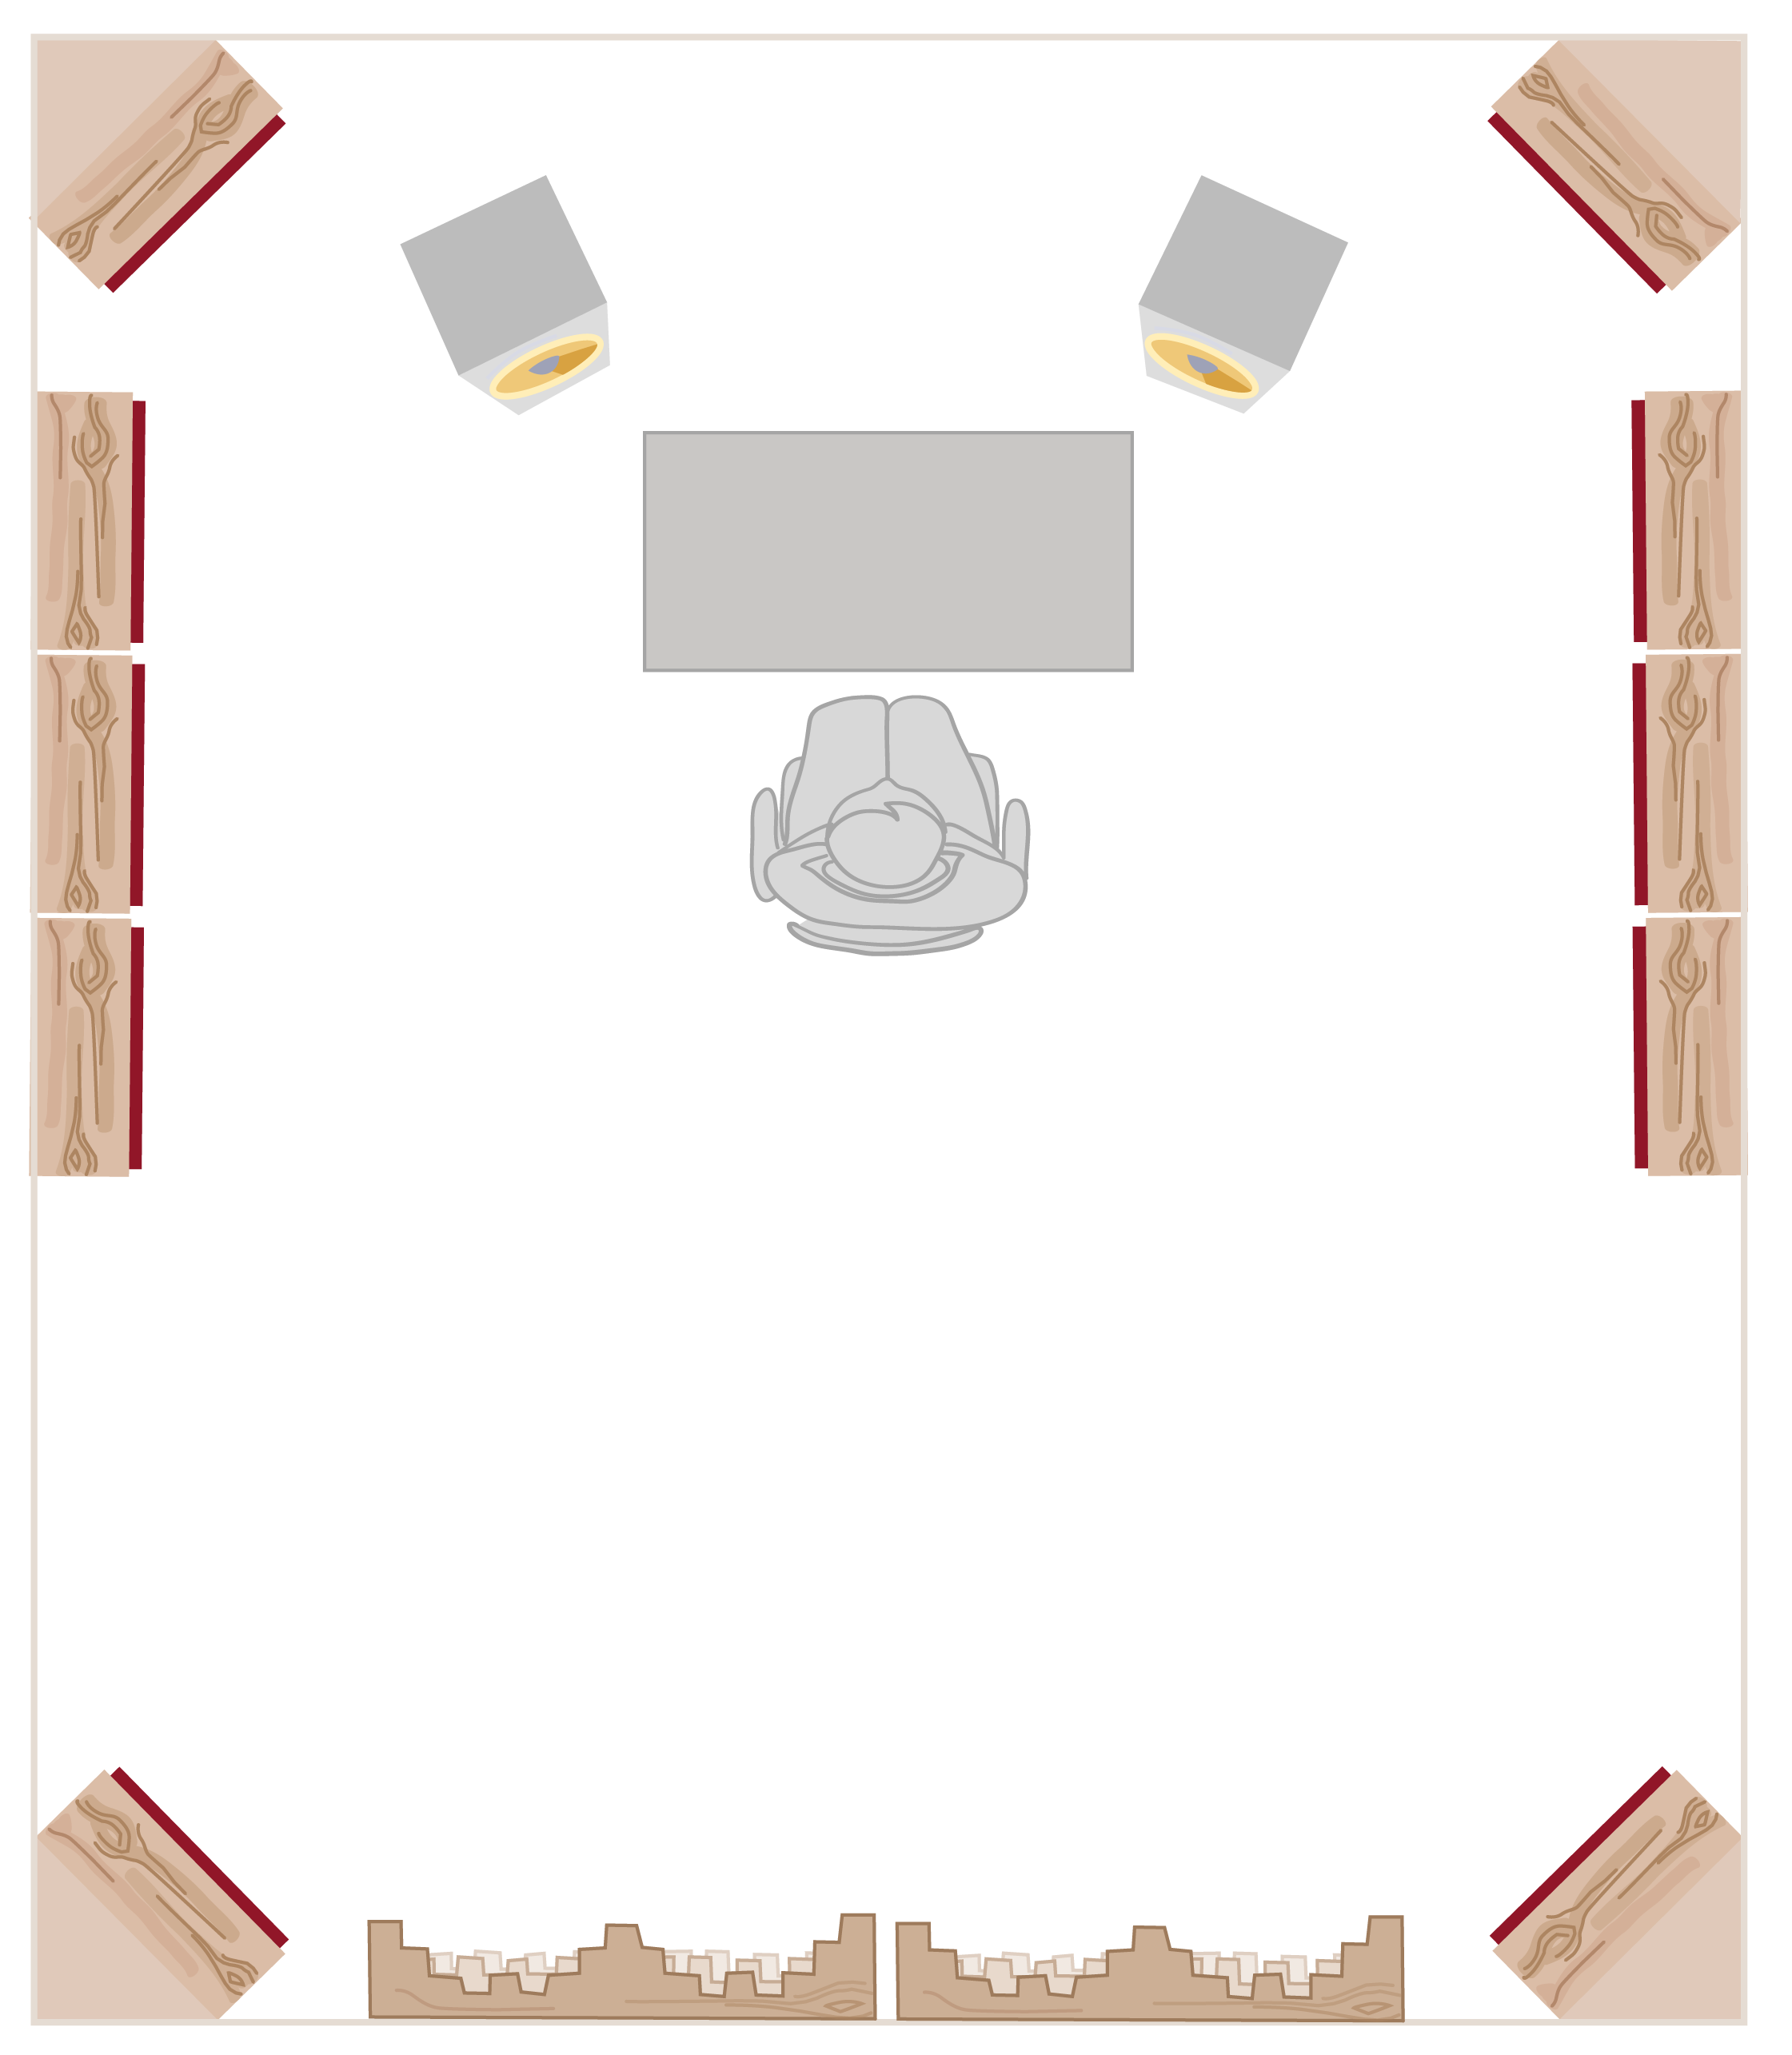
Unless otherwise stated, we will work with the placement of two studio speakers on stands. Remember that the speakers must be decoupled from the desk or controller. If your speakers are currently sitting directly on your desk, consider equipping them with small decoupling stands—or better yet, invest in proper speaker stands to isolate them fully.
Basic scheme of speaker placement relative to listening position.
Find a listening position
To begin optimizing your sound, you must first establish the perfect listening position. Start by facing the shorter wall of your room. While a rectangular floor plan is ideal, don't worry—this guide will help you acoustically treat any room you might have at home.
Ideally, the rear wall should be at least 3 meters away from your listening position. If your rear wall is closer, don’t worry; in later sections of the guide, we will advise you on how to deal with smaller spaces acoustically.
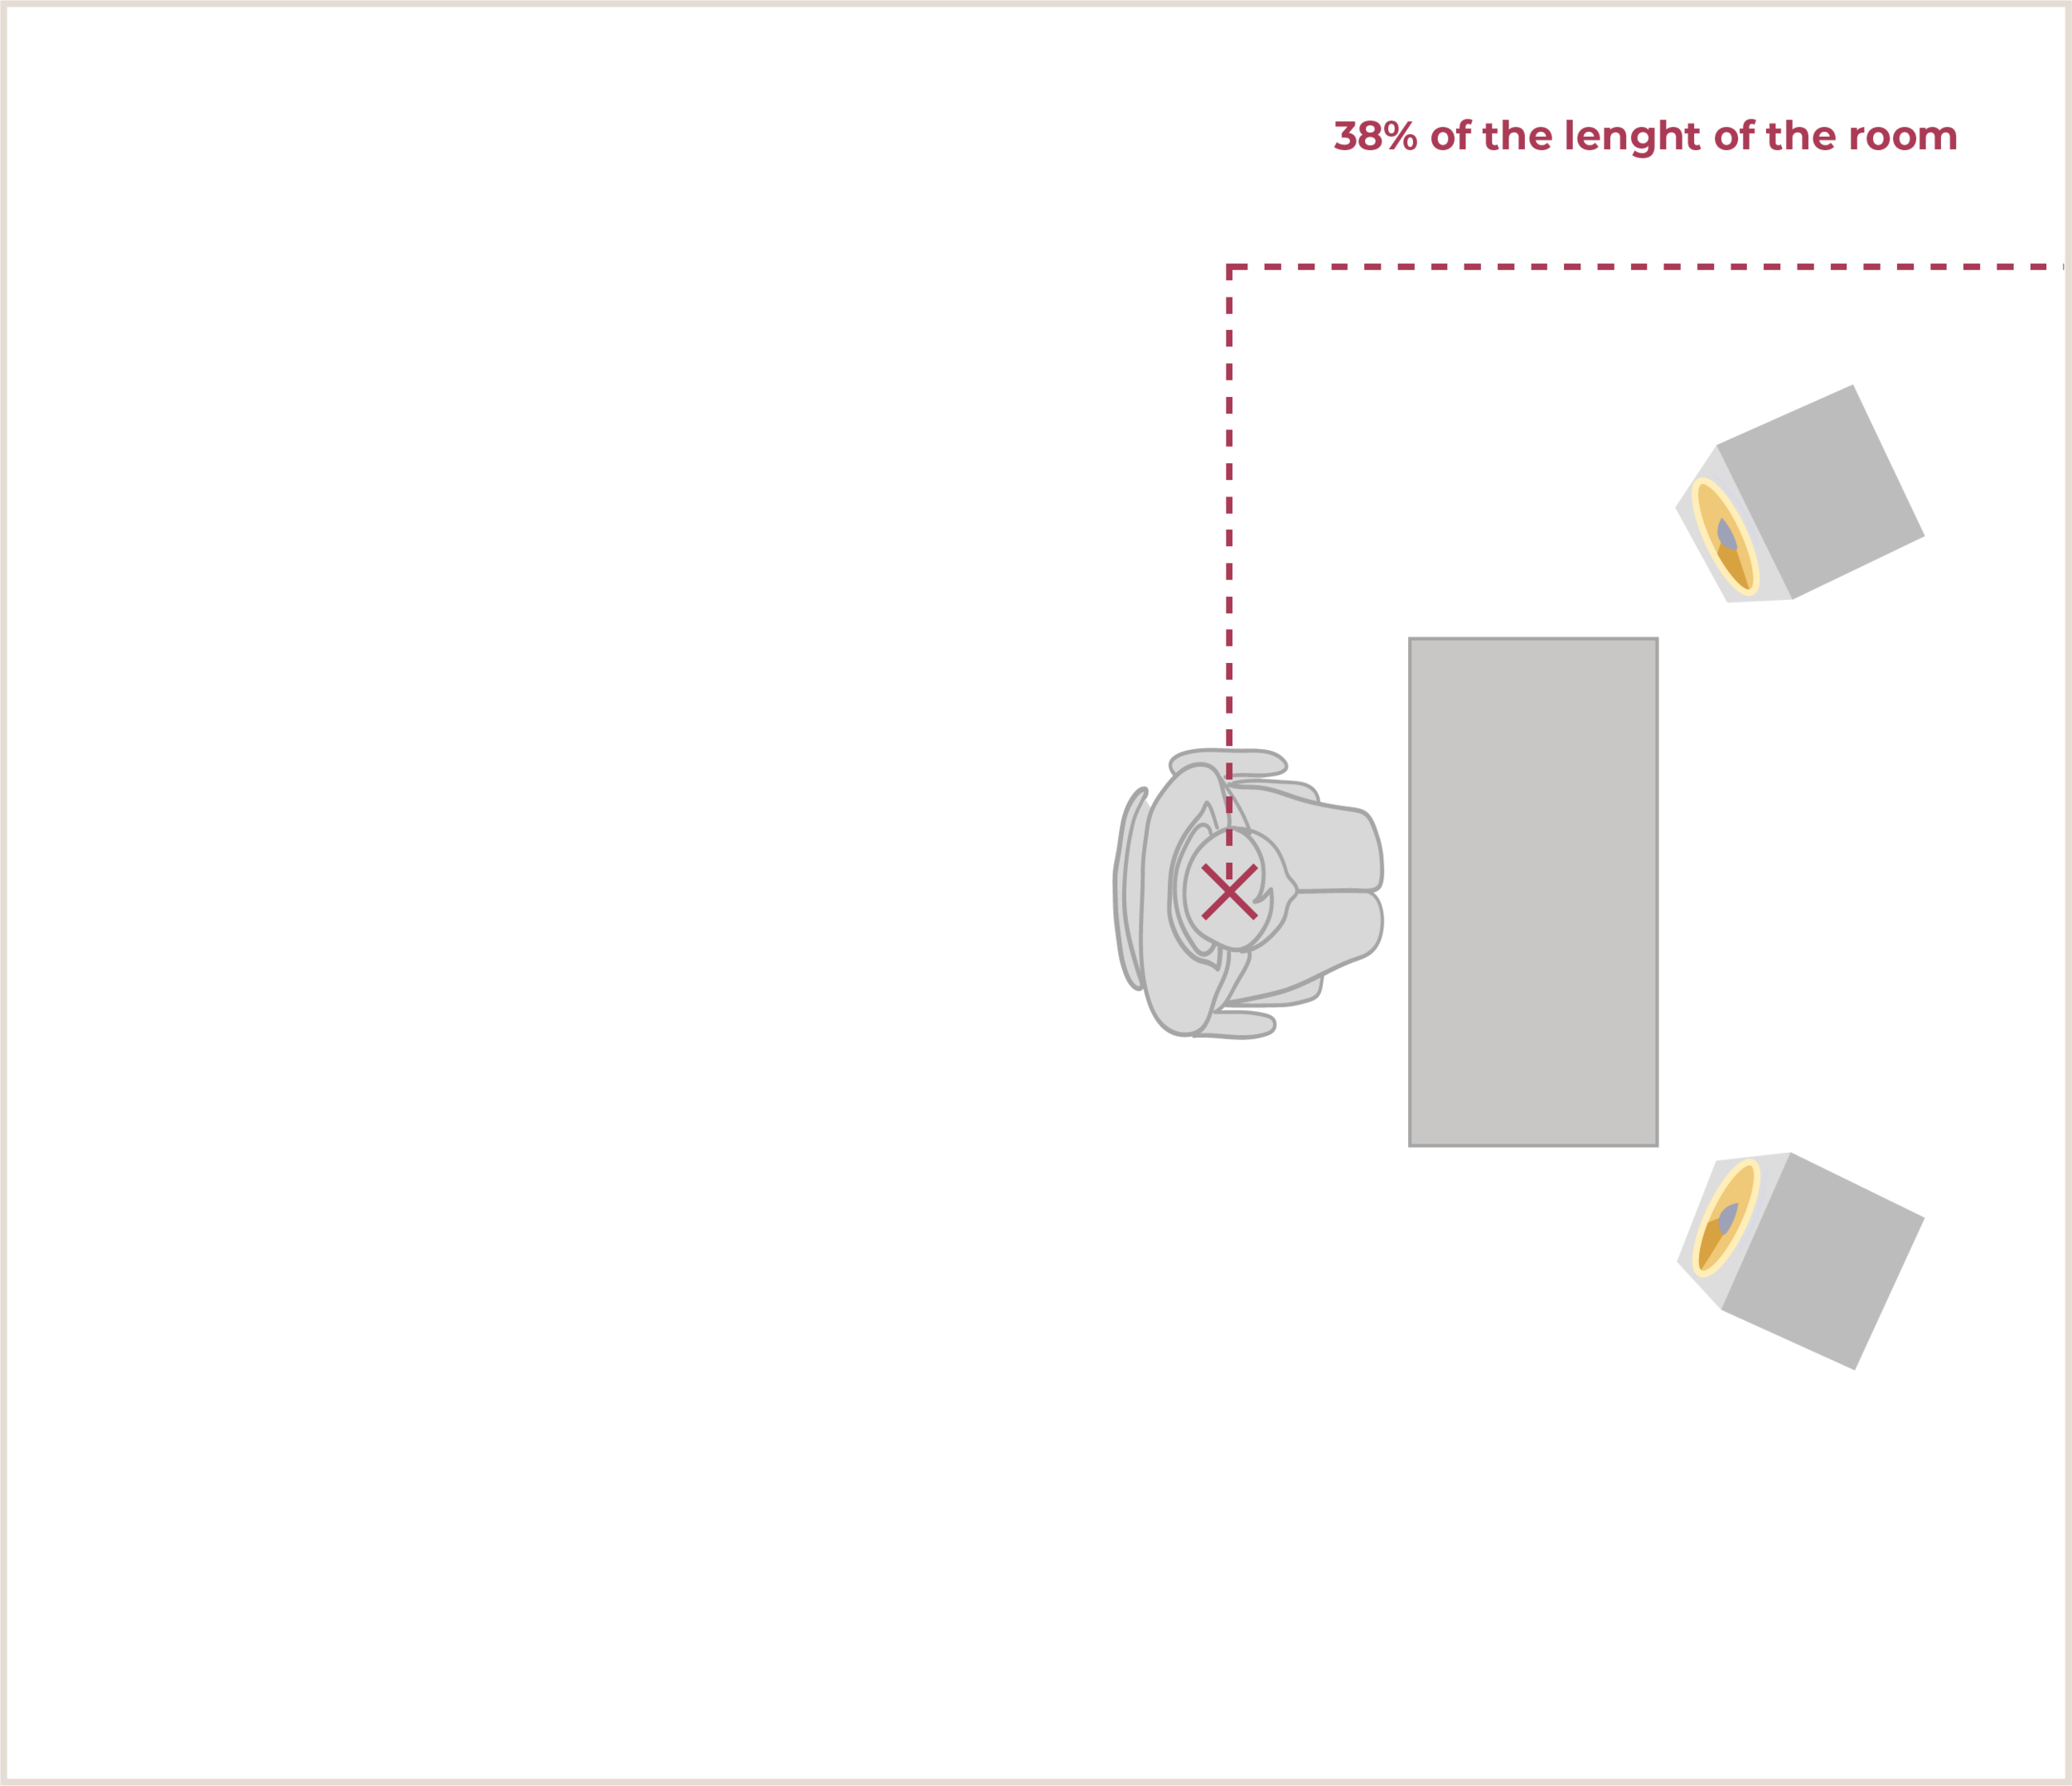
The ‘38% Rule’
The theoretically optimal listening position in a rectangular room can easily be found using the ‘rule’ of 38 %.
This is more of a clue than a strict rule, as it’s based on compromise, but it offers a great starting point for setting up your room. Remember, any small deviations can be solved later using acoustic panels.
How to calculate it:
Calculate 38 % of the length of your room and place the listening position that distance from the front wall, exactly in the middle between the right and left sides.
Here is the scheme:
Basic recommendation for the location of the listening position
Refining Your Listening Position
While the 38 % rule gives you a great starting point, there are crucial positions you must avoid to prevent severe acoustic issues:
Avoid the Wall and Midpoint Zones
Avoid the Back Wall: Never place your listening position directly against the back wall. Unless that wall is treated with massively thick absorbers, the sound will be strongly blurred by sound wave reflections. Additionally, if you plan to use a diffuser on the rear wall, you need sufficient space for the sound waves to scatter effectively.
Avoid Room Midpoints: In rectangular rooms, a dramatic decrease in the bass frequency response is observed at half points between parallel surfaces (front/rear, side/side, floor/ceiling). This creates an unpleasant drop in bass response—a quiet, acoustically inappropriate area.
Do not place your ears halfway between the floor and the ceiling.
Do not place the listening position within 50 % of the length of the longer wall.
This rule also applies to speakers: they should not be in the middle of the distance between the floor and the ceiling.
Avoid 50 % and 25 % Positions: Experiment with different positions between 35 % and 43 % of the room length, but avoid positions known for extreme room modes, such as the 50 % and 25 % marks.
The Essential Rule: Symmetry
For an accurate stereo display, your listening position must be centered between the side walls. Symmetry from left to right is absolutely essential for balanced stereo imaging.
Final Optimization
It is always ideal, of course, to take frequency response measurements at different locations. This provides the final, objective data to optimize your listening spot perfectly. We’ll tell you more about acoustic measurements in the last section of this guide.

The area of drop in sound pressure in the axial mode of the room halfway between the walls is caused by the natural way of propagating sound waves in the room. This is not where the listening position belongs.
Precision Speaker Placement
Speaker placement is a powerful and easy-to-control variable that directly impacts your sound accuracy.
The Equilateral Triangle Rule
The basic rule states that the listener and speakers should be placed in an equilateral triangle. This is what most manuals will tell you, and it is the only way to achieve accurate stereo sound.
However, in professional acoustics, a reference point is often used instead of the listener's head. Recording studio designers tend to place this point at the level of the listener's ears, but at a distance of up to 40 cm behind the listener’s head. Therefore, if you want to be truly precise and professional, place the top of the equilateral triangle at this reference point behind your head.
How to Achieve Practical Precision
Establish the Angle: From your reference point, look straight ahead and draw two imaginary lines: one tilted 30 degrees to the left, and one to the right.
Place the Speakers: Place the speakers along these 30-degree lines. You can sketch the whole geometry precisely on the ground using a string and a classic protractor.
Quick Check: From the reference point, you should only see the front baffle of the speaker—you should not see the sides of the speaker cabinets.
Isolation is Key
Speakers must be properly isolated from your working station because of the vibrations they produce. Place your speakers on dedicated speaker stands or use quality anti-vibration pads.
The crucial topic of the speaker's distance from the wall will be discussed in the following section.

A sketch of the speakers' location relative to the listening position.
Optimizing Speaker Height and Tilt
Achieving accurate sound reproduction requires careful consideration of your speaker's vertical placement and angle relative to your ears.
Height: Direct Path to the Ears
Studio monitors should generally be at least 120 cm above the floor to ensure a direct reach into the listener's ears when sitting in the ideal listening position. The standard non-tilted height in a studio is typically 120-140 cm.
A Critical Reminder: Make sure the speaker's location is not in the vertical center of the room (half the height from the floor to the ceiling), as this is a known zone for acoustic issues (room modes).
Professional Variance: In professional studios featuring built-in wall speakers, the position is often slightly higher (up to 150 cm. This accounts for the fact that a person in an ideal listening position may need to be able to stand as well as sit.
Tilt: Stay Focused
If you feel the need to tilt the speakers, 15 degrees should be the maximum. However, be extremely careful, as you still need to precisely point the speakers directly at the ideal listening position (or the reference point behind it).
What About Surround Sound?
While almost every professional will advise you to set up 5.1 or 7.1 speakers slightly differently based on your room, the foundational basics remain consistent. Here is the ideal basic setting based on international standards:
Surround Speakers: The ITU-R International Standard recommends that the right surround and left surround speakers be positioned between 100 and 120 degrees relative to the center front speaker. 110 degrees is the best place to start.
Subwoofer Placement: If you are also placing a subwoofer, it is recommended to place it at the front left or right, just next to the center line of the room and the front speaker.
If you consult other manuals, you might see different values for surround placement, often in the range of 135-150 degrees. This variance exists mainly because the formats for multi-channel studio speaker placement are still evolving and not perfectly standardized.
The takeaway is to experiment! Try different speaker placements to see which position creates the most realistic surround sound reproduction in your specific room. Ultimately, the goal is for you to feel completely connected to the music and sound field.

Basic surround speaker settings.
Why Speaker Distance from the Wall Matters
Here is a simple rule: Don't put speakers up against the wall mindlessly if you want them to serve you well!
Why? That's what we'll dive into in the following article. You'll learn how the boundary behind your speakers creates acoustic issues that need careful management.